I came across a beautiful tutorial for grass text and created one of my own and will try to explain it in the easiest possible way.
Lets go for it layer by layer.
Step 1: On first layer, Use a radial gradient tool to create a gradient comprising of dark green and light green colours. I chose #105002 and #70d223.
Step 2: Search for grungy paper texture on google and get the image of your choice. Cover your canvas with the texture image . Go to image>Adjustments>Desaturate . Use overlay style with opacity around 70%.
You can use more than one textures for a rough look. I even used Filter>Texture>Grain to make it look rough.
Step 3:Search for grass images and select the one you like and cover your canvas with the grass image.
Step 4:Choose a font of your choice preferably bold and thick and write text using white colour in overlay mode with 50% opacity over the grass layer.
Step 5:Now select the boundary of text in bit rough manner using the pen tool. If you dont want to make its edges rough , use magic wand. But pen tool offers a better look. Select the path you just created with pen tool for future use. You can save it by going to path tab and clicking on a small arrow to save.
Step 6: After selecting the path using pen tool on the text, right click on it and select 'make selection'. Select the grass layer of the image and hit delete. It will delete the grass surrounding the text and what you will get is your text written with grass. You can hide/delete the text layer as it gave a better look in my case.
Step 7: In similar way, create another layer of grass and use the pen tool path you saved and cut the text in grass as you did earlier. And place both the grass text layers one over the another with the lower layer acting like shadow of the upper ,hence giving a 3-D effect.
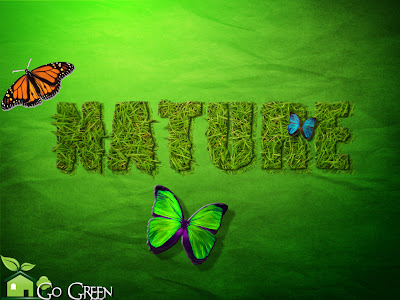
Step 8:Play with some more gradients or lightning effects to give glow to your image. An eco-friendly logo acts likes defining the meaning of the image and give some finishing touches using blending options. I used the following effects.


Lets go for it layer by layer.
Step 1: On first layer, Use a radial gradient tool to create a gradient comprising of dark green and light green colours. I chose #105002 and #70d223.
Step 2: Search for grungy paper texture on google and get the image of your choice. Cover your canvas with the texture image . Go to image>Adjustments>Desaturate . Use overlay style with opacity around 70%.
You can use more than one textures for a rough look. I even used Filter>Texture>Grain to make it look rough.
Step 3:Search for grass images and select the one you like and cover your canvas with the grass image.
Step 4:Choose a font of your choice preferably bold and thick and write text using white colour in overlay mode with 50% opacity over the grass layer.
Step 5:Now select the boundary of text in bit rough manner using the pen tool. If you dont want to make its edges rough , use magic wand. But pen tool offers a better look. Select the path you just created with pen tool for future use. You can save it by going to path tab and clicking on a small arrow to save.
Step 6: After selecting the path using pen tool on the text, right click on it and select 'make selection'. Select the grass layer of the image and hit delete. It will delete the grass surrounding the text and what you will get is your text written with grass. You can hide/delete the text layer as it gave a better look in my case.
Step 7: In similar way, create another layer of grass and use the pen tool path you saved and cut the text in grass as you did earlier. And place both the grass text layers one over the another with the lower layer acting like shadow of the upper ,hence giving a 3-D effect.
Step 8:Play with some more gradients or lightning effects to give glow to your image. An eco-friendly logo acts likes defining the meaning of the image and give some finishing touches using blending options. I used the following effects.

Step 10: Enhance your image with some glow effects or beautiful creatures. I preferred butterflies for the same. An eco-friendly image is ready!!!
Get the psd from here
No comments:
Post a Comment
Feel free to comment or post your query